Welcome to The Few Good Men

Thanks for visiting our club and having a look around, there is a lot to see. Why not consider becoming a member?

Tournament Quick Battle 1 Insight

colin.s.davis

FGM New Member
FGM MEMBER
Joined
Dec 23, 2021
Messages
10
Reaction score
17
Age
37
Location
USA
Post 1

I wanted to share some insights on the first battle of a CMSF2 Tournament Battle I am participating in.

We are fighting on the Rural Stronghold map in a probing attack.

Battle 1 vs Ben Rural Stronghold (1200 x 1500) 301p.JPG

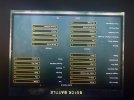
Here's our general setup conditions. Other parameters include using whole 'blue' formations and special teams, no single vehicles.

IMG_0731.jpeg

I select to play US Forces, with the limitations of ideally using mech/armor formations, stryker if would like, an no pure dismounted formations.

I am using this tournament as a means to practice my TLP (Troop Leading Procedure) process. I've emphasised focusing on mission analysis, COA (Course of Actions) development, and battle tracking all through analogue tools. This is should help creating plans in an austere environment quickly.

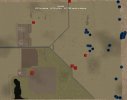
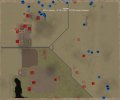
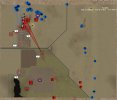
I began with terrain analysis. This follows the OAKOC (Obstacles, Avenues of Approach, Key Terrain, Observation & Fields of Fire, Cover & Concealment) method. Once we began the delpoyment phase and new what map we were on, I searched among the probing maps in the scenario editor IOT (in order to) find the correct map. This greatly assists in terrain analysis through better understanding elevation contour lines, objectives, deployment zones etc. By mapping the contour lines, I could more easily identify the IV (indivisibility) lines than purely just scrolling across the entire map for a while. IV lines are great to hide and move behind and find hull down positions (as we all have learned through this game intuitively). After terrain analysis I moved onto Enemy analysis.

IMG_0738.jpeg

This began with begining to determine what task organization I would most likely use given the battle conditions and terrain. From their potential composition, strengths and weaknesses, I came to a determination they most likely will not bring any motorized, mechanized, or armor forces. By bringing dismounted units only, it would provide opportunties for them to conduct ambushes, reverse slope defenses, and hide among buildings to find engagements in their favor. I also determined b/c of the US lack of good ADA (Air Defense Artillery) that a most dangerous COA would be for them to bring something like 3x pairs of MI-24s. So, I imagine they'll have a composition of a dismounted Battalion, MLRS or Arty company worth of batteries, at least 1x Hind Section, an ATGM PLT, and a Recon CO.

IMG_0745.jpeg
 

Attachments

  • IMG_0731.jpeg
    IMG_0731.jpeg
    2.2 MB · Views: 13
Post 2

Templating their task organization onto the terrain gave me the following ENY SITTEMP (Situation Template). This is how I would try and 'f*ck' myself up given what they could have. I believe they'll have a company forward in a reverse slope defense with a couple AT (RPG) teams on the IV. They'll use their MI-24s IOT attrit my forces before we'll use our optics advantage near the deployment zone. They'll have OPs on each of the hilltops (Key Terrain) with more heavy ATGM teams behind the crest IOT get enfilading fire on forces across the map. They'll most likely have at least a PLT on the reverse of each hilltop as well. Within the OBJs (buildings) They'll have PLTs spread out comprising the other two Companies. In the rear of the AO will be ADA units IOT deny the space against my Ravens or CAS.

IMG_0742.jpeg

Usually, after ENY analysis I conduct Friendly analisys. This is because enabling units (CAS, CCA, FA, EN, HUMIT, etc.) are normally assigned down and not selected by myself for missions like we can here in CM. Now, even with a 6000 point versus 4000 point difference, this kind of limits me to only about a Company in size versus a BN worth of units. Even with the US capabiliities, this presents a serious challenge (as this game always does exceptionally well), especially b/c I cannot request specific Class V (ammo) munitions IOT ensure I have enough rounds against such mass or airpower (stinger teams only have 2x rounds WTF!) That is one of my main concerns in being able to secure all these OBJs; I just may not be able to have enough ammo to do it. Anyway, I've decided to assume some risk by not selecting any CAS IOT ensure I can have a MECH CO Team (2 PLT MECH, 1 PLT AR) and a lot of mortar rounds.

IMG_0744.jpeg

Now given I "understand" the OE (operating environment) and have conducted my MA (Mission Analysis), I developed my COA sketch. This is done by;
1) determining a solution (Tactical Task; destroy, neutralize, breach, secure, etc) against every ENY action on the ENY SITTEMP and purpose (deny, prevent, attrit, etc)
2) drafting a conditions scheme flow from the purposes that allow me to advance. The Army is moving to a scheme flow of intel drives, fires, drives maneuver. This intuitively makes sense, but is a new change in the lower (PLT/CO) tactical levels of doctrine and our schooling.
3) assign units to the tasks

IMG_0741.jpeg

This sketch looks CRAZY! doesn't it? It's very busy. So generally, in a big 'hand wave,' I'll take the treeline/IV line and conduct Intel (recon). This will allow initial fires (Indirect and direct) IOT set conditions for forward movement across all the open areas. I'll condcut a feint to the south, then with smoke manuever to the north Key Terrain/Hilltop. This will allow me to continue to attrit their forces while preparing me to breach the OBJs from the shortest distance possible. With a CO TM like I can afford, in real life I'd say getting to the hill would be as far as I could go and would tell my Battalion CDR we need another Company to take the OBJs (or he and the S3 would tell me that b/c they know way more than me). B/c this is a probe attack and victory points are 50/50 with occupying OBJs and ENY casualties I'm a bit concerned how victorious I can be on this battle (again; BN 200-300 personnel vs CO TM 50 personnel and no extra CL V 'ammo').

We shall see how I can adapt and overcome!
 
Clearing the ridge line: This battle immediately opened with two actions. 1) I shelled the tallest tower on the OBJ with 120mm mortars followed by 25mm from a bradley a couple turns in, and 2) The ENY called in MI-24s. My stinger teams engaged but we could not destroy them. I got lucky with the MI-24s conducting their straffing runs on the forward side of the ridge line (possibly on their own positions). I believe I may have guessed right and eliminated his JTAC as they have not been called in at any other point in this fight. My Raven was knocked out with truck ZSU-23 fire from the rear of the south hill.

IMG_0781[7150].jpg

The ridge line was occupied un-contested, but I was immediately engaged on the reverse slope side. As you can see from the previous ENY SITTEMP, I was correct in believing he'd position forces there. I also was correct in the enfilading positions on the rear side of the two hills, but was incorrect on what weapon system he'd use. They ended up being static T-55s. These were destroyed with javelin fires. As the fight progressed, I was a bit surprised by how many units he emplaced on the southern part of the AO between the ridge line and the hill. It seems he is assuming that to be my main Ave. of Approach (AoA) b/c of the covered IV lines from the main OBJ. I have been working to atrit all his positions with IDF (in-direct fires) and Bradleys/Abrams doing berm drills. *Berm drills= one vic moves to hull down and engages an identified unit for 10-30sec and reverses out of sight IOT prevent effective counter fire esp. with ATGMs.*

javelin vs static t55.JPG
stinger vs mi-24.JPG
cool armor pic.JPG
 

Attachments

  • COP 2 turn 22.JPG
    COP 2 turn 22.JPG
    76.7 KB · Views: 6
Crossing the LODA (Large Open Danger Area)/ Gap Crossing:
At about turn 32, due to the heavy defense on the south part of the map vic (vicinity) of K2 hilltop, I decided not to conduct the Feint Attack and begin preparations for the LODA crossing on the north side. The base concept/scheme I planned to use followed the normal SOSRA principles (Suppress, Obscure, Secure, Reduce, Assault). As you can see in the below picture, I called for fire (CFF) for a linear smoke mission to obscure the passage from the main buildings and the south K2 hilltop. I also CFF'd IDF (in-direct fires) with HE on the K1 hilltop proper. I used a PLT of bradleys and a section of Abrams in a support by fire (SBF) role in order to provide direct fire suppression. The IDF and SBF units were to suppress/neutralize/destroy (whatever they achieve) known & suspected. ATGM positions. My assault force consisted of the other Bradley PLT.

LODA COA Sketch.jpg

And that's where it it got bloody.

1) An Abrams took a well aimed ATGM while reversing into defilade on the underside of the front side hull.
2) The smoke was not in enough quantity to provide adequate obscuration.
3) The ATGM team was not fully suppressed and scored a catastrophic kill on a bradley (10x KIA)
4) Another Bradley back on the ridgeline took an ATGM round and was destroyed (1x KIA)

LODA 2.JPG

LODA 4.jpg

Lessons: Breaches and Gap crossings are known to be one of the most deadly points of an operation (our planning factors are 50% casualties). This held pretty true in this case. I do believe if I would have assaulted with a section (2x) Abrams just ahead of the Bradleys it would have been a better crossing. Other Bradleys could have served as the northern SBF. Also, the micromanagement of ensuring direct fires are placed on the ATGM positions for the entire crossing has to be done. Letting up for get a couple sets of 15sec presented all the time needed for them to inflict significant casualties on my force. In real life I would need to ensure I have enough Class V (Ammunition, esp. IDF mortar ammo) in order to support such a crossing properly.

I feel terrible for conducting such a deadly and poorly executed crossing.

Up next, Clearing K1 Hilltop.
 
Clearing K1 Hilltop

I attempted to methodically clear the hilltop. It came at the high price of 15 casualties (wia & kia). A couple of fanatic single hold outs in trenches made me earn that ground with blood. While I was clearing the fighting positions on the extreme north western side, an Abrams and Bradley began to work on attriting targets on the objective buildings by slowly pie'ing the hilltop. A PLT of SF troops were positioned well on the reverse slope (as I templated) and again made it costly to drive out and from the hill. The ENY called IDF (in direct fires) on the hilltop but b/c of the delay in Syrian call times I had mostly moved on from that position.

clearing k1 1.JPG

clearing k1 2.JPG

clearing k1 4.JPG

clearing k1 3.JPG

Toward the end of the clearing, I began to clear the PLT defense in the south and drive forward in the southern K2 hilltop with an Abrams, Bradley, and 1x squad.

k1 cleared overlay.png
 

Attachments

  • k1 cleared.JPG
    k1 cleared.JPG
    94.4 KB · Views: 3
Assaulting OBJ 1
AO (Area of Operations);
AO Overlay.jpg

The terrain and enemy disposition presented only a limited amount of options to assault OBJ 1. Normally, I'd setup a SBF (support by fire) position on K1 to suppress the OBJ while the assaulting force maneuvers and makes the dangerous crossing. This could not be done here due to K1 being under observation and direct fires from OBJ 4, OBJ 5, and K2 hilltop. Every element I tried to emplace came under direct fires. There was a very narrow lane from the K1 hilltop to OBJ 1 where the building on OBJ 1 blocked all of OBJ 5 and K2 hilltop. OBJ 4 would only have about 100-150 meters of sight lines on that route. This meant having to conduct a frontal assault with Abrams, Bradleys, and dismounts.

obj 1 assault plan.jpg
prepping assault.JPG

In order to mitigate the risk of ENY on the reverse slope, w/in the building of OBJ 1, and OBJ 4, I planned for a vic (vehicle) to advance as far as could without exposing itself to OBJ 4. It'd then pop smoke out front 30-50m. The next vic would then bound forward to the edge of the smoke and pop smoke, etc. etc. Through this a measure of obscuration could be self provided during the assault. Direct fires would be applied onto known, likely, and suspected positions on the K1 reverse slope, OBJ 1, OBJ 4, and OBJ 5. Anything one can do to cover all parts of SOSRA helps. Dismounts would then reach and secure a foothold w/in the building on the northwest side.

The actual assault was again costly. Key items:
-Assault force got stuck in a traffic jam
-Smoke did not fully cover the "breach" lane
-Bradley took an rpg-29 hit; 4x kia b/c kept dismounts mounted
-Took 11 total casualties during assault

traffic jam.JPG
assault smoke.JPG
bradley hit.JPG
foothold achieved.JPG

Lessons:
1) (for the game) I should have micromanaged the vic movement paths better IOT prevent the traffic jam. (in reality) This is an issue that the subordinate unit leaders and drivers would normally resolve themselves. However, crazy stuff like that happens all the time as well; especially under stress or with new crews.
2) Mounted vs Dismounted: I should have realized that with ENY on the reverse slope that the risks of mounted casualties was too high and dismounted the assault force prior to the assault. However, even after all dismounted we took another 7 casualties. *Breaching a prepared defense is deadly* I believe I should have slowed down and more methodically conducted the assault. The ENY in this fight did not stay suppressed and 'cowering' long enough, most likely due to them being selected with high soft factors (elite, fanatic, fit, +2 leadership, etc.) The Abrams also should have stayed in front all the way to the building, then had the Bradley's move up with the dismounts IOT shield those elements.
3) Class V (ammo); Here's a great example of trying to over-extend the operation without everything required (support, material, vics, pax, etc.) to be at an advantage for the execution. I was out of IDF smoke and HE. The vics were begining to become low on ammo. My assault force had sustained significant casualties on the LODA crossing. The ENY and terrain funneled me into a frontal attack. I need to keep these in mind in order to know when to halt and request follow on forces take the fight, resupply, or change the nature of the operation in order to not spend life needlessly or against unfavorable odds (when we can dictate them).
 

Attachments

  • obj 1 assault plan.jpg
    obj 1 assault plan.jpg
    647.1 KB · Views: 3
Taking the Objectives

overlay.jpg


-Clearing OBJ 1 was again, way too costly. ENY in last middle section was in good position where I could not provide DF (direct fires) on him from my INF or vics just outside the building. I ended up having to suppress with DF from vics by K2 as they were attacking OBJ 5. (Reminder for those not familiar; the game simulates rooms and obstructions [furniture] but does not show them visually).

Enter and clear 1.JPG
bradley DFs on obj 1.JPG

-OBJ 2; sent an FO team to recon the trench line. Was just fine and secured with no casualties.

-OBJ 3; concurrently to attacking OBJ 5, I advanced the abrams on the far west of the AO, and then south to positions were OBJ 4 could not see them. Dismounted INF moved from OBJ 1 to the buildings on OBJ 3. They were far enough from OBJ 4 not to be spotted. I methodically cleared those buildings ensuring no casualties were taken.

-OBJ 4; From the beginning I had planned on not assaulting the OBJ 4 complex. It was too far away with no good concealed or covered routes to it. It also was a minimum points OBJ, and so I didn't need it for victory.

-OBJ 5; Once I cleared the dismounted PLT in the valley, there was no resistance on the south side of the map unitl getting close to the reverse slope of K2 and OBJ 5. A technical with a dismounted DSHK was knocked out, but one ENY was later able to hide in the shallow part of the pond and wound 3x of my Soldiers. I used an Abrams, Bradley, and a dismounted SQD to eliminate almost all of the ENY on OBJ 5 before assaulting. Even so, when I did try to cover the open distance, I again took 3x casualties.

atk thru k2.JPG
randon dshk gunner.JPG
asslt on obj5.JPG
 
Conclusion

This tournament format takes the victory points and divides by 10. So initially I scored 86 to his 30 points. The Syrian's also gained a bonus point for every percent of US casualties generated. Because of some of my poor decisions and my opponents good competence, this awared him another 56 points. So, in the battle concluded in a Draw with both of us receiving 56 points surprisingly.

It was for this tournament's sake I continued the fight past what I would in real life. Probing missions in Combat Mission place about 50/50 emphasis on OBJs vs casualties. So, IOT gain any significant points I had to take terrain. The mission was set for 1&1/2hrs. That, along with the limited Class V, prevented me from sitting back and slowly attriting his forces. It was understanding these OE (Operational Environment) conditions that also guided my COA selection and decision making in the fight.

end AAR screen.JPG

SITTEMP Overview: After the battle, here's were all units left were located at.

end all left exposed.JPG

Operation COP: Here's my Common Operating Picture (COP) as I tracked all engagements during the fight. Once an ENY unit was identified, I'd plot it on the COP and then on an ENY Composition sheeting. I tracked ENY WIA/KIA per unit on there. I plotted Friendly WIA/KIA with blue slashes and 'Xs.' Once the operation came close to OBJs 1-3, I printed another closer in blow up and used that COP. I liked the terrain GTAO as the baseline page with the COP on top. It assisted well with keeping in mind positions of advantage quicker. It's also the method I use when leading an operation from my kit or rucksack (aka- no truck or tent CP)

Operation COP.jpg

My ENY SITTEMP Original: It seemed for the most part, my ENY analysis was pretty close. I did not believe he would setup a PLT in a forward perimeter defense on the south in the vicinity southeast of K2 hilltop. This led to me not leading with a feint ATK. It was after my forces made the LODA and ATK on K1 hilltop I ATK'd in the south to support the north. Instead of ATGM positions on the rear enfilade of the hilltops he selected to use static T-55 tanks. So the unit was incorrect, but the position and effect intent was correct.

ENY Sittemp.jpg

Turn Notes: In addition to logging contact reports and BDAs, I used captured events on an impromptu log. In future operations I'll print a couple Staff Duty Logs to use (just like a normal Command Post would have). This narrative assisted with tracking all events and then determining next actions.

Contact Log Example.jpg
Lessons:
-Unless I was in a conflict like Ukraine (possibly), if I conducted such an ATK in this poor competence manner; I would expect to be fired or sent to Leavenworth (US Army prison).
-Lead maneuver in open spaces with heaviest armor b/c it has the best chance of taking shots and staying alive.
-Ensure to understand the mission risks; IE- not enough IDF Class V, smoke, not enough forces for whole operation. Ensure to discuss with higher Commander. Get those prior to beginning the operation. If the bigger situations is so dire the higher Commander is willing to accept that higher risk of casualties, then keep as many alive as can IOT gain mission success. I'm going to print a couple DRAW (deliberate risk assessment worksheets) pages and put them in my mission binder IOT capture and present risks.
-Good analysis of terrain and enemy prior to determining your plan continues to be important. Humans tend to think alike and so where I'd position my forces may usually be where another person may position theirs. So while no plan survives first contact, knowing positions of advantage of terrain and how your ENY would use them will help come up with better decisions after that first contact.
-There is no real substitute for Force on Force practice. Scenarios, and task training are good, but cannot replace another thinking human bean trying to completely f*(k your sh*t up. I'm truly thankful for the UK and US Fight Clubs to provide this practice.
 
Back
Top