Tactics Academy DAR#2 AC Spectre Vs 2054172

Im really behind on this one, they have agreed to a ceasefire.

Turn 7 from numbers.

Not too much to report, that shreck died on his left. He seems to be making a push for the 2nd flag but his infantry is getting tired now, he's moving his Tiger left to deal with the armor he's spotted there.

AC31.jpg

AC32.jpg


Ok i am weak on my left side and that is where his armour thrust will come from...I am pulling a platoon from my right to block up the rear of my main thrust in the center. I am moving my armour inthe buildings with my flanks protected with men and buildings.
 
Turn 7 from AC.

He's halted his movement in his center, put short arcs on his inf there and hidden them. He only has a tentative hold on that flag and Numberz is already moving against him.

AC33.jpg

AC34.jpg


Orders issued, armor moving up. Infantry near the flag are hiding with minimal arcs to keep them from revealing their positions.

My northern armor has an los to the heavy building where some infantry is hiding. Three Shermans on area fire should evict them post haste.

We can see AC has spotted more units that Numberz but this is probably because numberz is pushing harder.
 
Turn 8 From AC

Not much happened apart from AC demolishing a small heavy building. Another vehicle just burst into flames again, a gun HT fired a canister shot at it but it missed, seconds later it just blew up lol. He's moved his left hand armor up onto that ridge for some overwatch positons.

AC35.jpg


Two volleys from 3 Shermans turned the heavy building to rubble and sent the infantry running but numbers took out my last jeep with a shot of cannister.
 
Turn 8 From Numberz, he keeps nudging his troops forwards towards that second flag, but there are 2 plts of AC's inf there in ambush positions, if he makes any rash moves this could get messy.

AC37-1.jpg


AC38.jpg


Attack on the jeep went off perfect.
Running my Hts to the rear and a safe place...will use them later to mop up infantry.
 
AC can pick up the big flag when he wants really...there's cover enough for his infantry to get in the house. But he does have to stop Numberz contesting it. He'd better hope his armour is decisive.
 
Turn 9 from Numberz

He's pulling his HTs back from his left presumably in case AC makes an armored breakthrough here, they arn't really needed any where else.

AC39.jpg


AC seems to be making a cavalry charge in the middle, he's took his armor to within inf held AT weapons range, Numberz squads mainly has rifle grenades (which shouldn't be too deadly) but one squad here has magnetic mines and there is a shreck (both ringed), he currently has his infantry firing which is why no one has shot at them yet.

AC40.jpg
 
Turn 9 From AC

We see AC is making 2 armored thrusts, however he is pushing his armor first and as we saw in the last post he's moving his armor in the middle straight into the middle of Numberz infantry. Leading with your armor is 9/10 times a very very bad idea, tanks arn't very good at spotting infantry and usually don't spot them until they've got off an AT weapon or 2 against them.

Also in both groups he is leading with his M10s, bad idea IMO, they pack the most punch of any of his AFVs, you don't want them to be the first units to be spotted as they'll be likely to be the first to get took out. He should have led with his shermans and if anything that needed to be took out by the M10s was spotted he could maneuver these in to get a shot.

AC41.jpg


AC42.jpg


Armor still moving cautiously. I see lots of HT,s and 1 Tiger but I am sure there is other armor around. Numbers is growing increasingly cocky in his emails, don't know if he is simply trying to rattle me or he is actually ready to spring some unforeseen trap on me. My 105 spotter was halted and issued orders for area fire near the Tiger. He is within command distance so the firing will commence in 2 minutes.
 
Turn 10 from AC

AC43.jpg


Amazingly AC gets out of this little pickle relatively unscathed. A rifle grenade is launched but it misses, the tanks keep moving and start blasting away the infantry. Numberz Brummbar makes an appearance but it misses the m10 from 100m away and the shell blasts ontop of one of Numberz squads, i don't know if it caused any damage. One of the shermans took out a gun HT (top left) before returning fire on the Brummbar, the shells bouncing harmlessly off. A shreck takes out one of the shermans.

AC44.jpg


Surprise, Numbers jumps on my souther group of tanks with a Brumbar and infantry. Lost one of my Shermans to a Schreck shot and will be lucky if I can get the remaining tanks through the engagement unscathed.
 
Turn 10 From Numberz

AC45.jpg


His brummbar actually does more damage to his own inf than the enemy armor, caused 2 inf casualties in the squad it accidentally hit. Not all of Numberz inf has been pinned by ACs armor, so he still stands a good chance of KOing a tank in the next round. Here we see Numberz left is pretty void of any AT capabilities, he seems to be moving his tiger across to deal with this.

AC46.jpg


My infantry are not as lucky as usal but they have held him back for another round.
 
OK i've been neglecting this over the past week or so, apologies for that.

Here we have turn 11 from AC (i can't find the file for numberz view but not much happens.

He loses another tank to grenades (white circle) and is taking light mortar fire (black circle)

AC48.jpg


Got out of that as well as could be expected. I was able to break contact with only the loss of one more Sherman. Let's see if we can distract Numbers with a little bit of nastiness from the north!
 
Turn 12 From AC

He lost another sherman to a side turrent pen, not sure what took it out i'll check when i view the turn from numberz.

He's lost another sherman (white circle) and his 105mm is falling near the tiger (black circle), he's moving his shermans on his right up to try and flank some (black arrow). The shermans get a fleeting sight of the back of the brummbar, one sherman even gets a shot off but it misses, and the dust from the 105mm shells blocks the LOS, here's another good lesson - TIMING! lol

AC49.jpg


Just saw this from AC, he seems to think it was a shreck that took it the sherman out.
Numbers takes out another Sherman with a Schreck shot. Will I never learn not to idle around in a hot zone??!!
 
Turn 12 From Numberz

Not much happening, it was a Shreck that took out that Sherman, im not quite sure what he's doing with his HTs (white line).

AC50.jpg

Also note this, he's hiding his tiger. Now i never ever hide tanks, for a start how the hell do you hide a tank? Im pretty sure all hiding tanks does is reduce the crews spotting ability, it's certainly not hidden from AC as he has a clear view on it.

AC51.jpg


Damn that was a great shot for a green Panzerschreck ...give that man an iron cross
 
Turn 13 from Numberz.

AC's 105mm fire has immobilised his tiger, he must be gutted. I wonder if Numberz was unaware of the threat (unlikely) or just thought he could risk it (more likely), even so, just reversing his tiger 10m back could probably have saved him from this fate. Lesson from this, never underestimate the power of artillery against tanks, you're very unlikely to get a direct KO but you're quite likely to blow off a track or two and damage guns.

AC52.jpg


well I am preparing to meet the next thrust...My tiger is immoblie but in a good spot and i will try a drop a mortar or two into his M10 from the first attack
 
Hiding a tank reduces the noise signature...ie the engine is turned off. You will get a sound contact from even a stationary tank if you get close enough, even if you can't see it.

Ermmmm, even so, I don't hide tanks either.
 
Hiding a tank reduces the noise signature...ie the engine is turned off. You will get a sound contact from even a stationary tank if you get close enough, even if you can't see it.

Ermmmm, even so, I don't hide tanks either.

Im not too sure about that, i remember seeing a POS test somewhere that showed hiding didn't really affect the sound signature from it, will have a look to see if i can find it
 
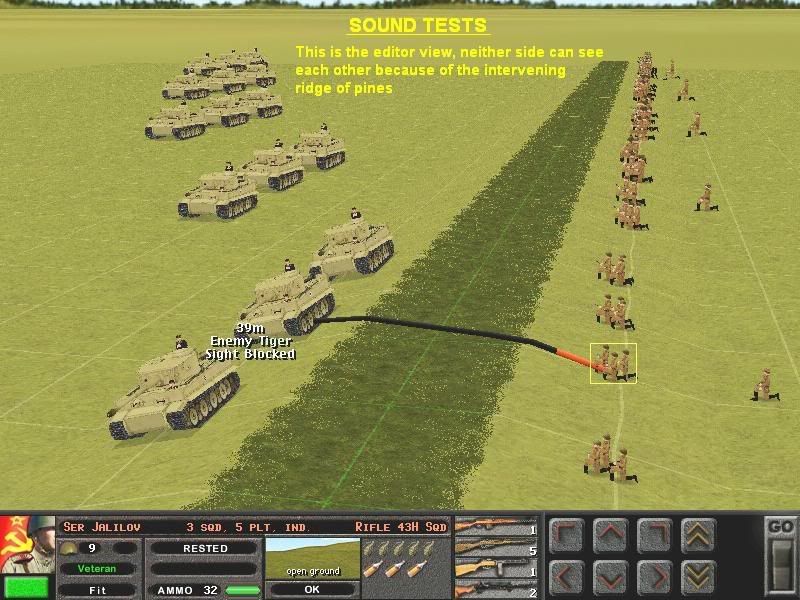
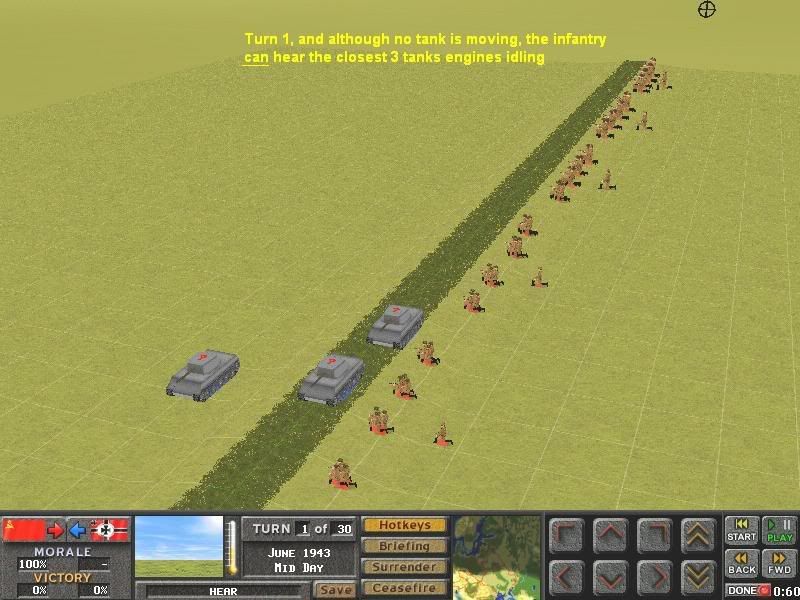
This series of tests reveals that -
Tanks moving on 'Fast' are the noisiest.
'Hunt' is a bit quieter.
'Move' is much quieter.
Stationary tanks can only be heard if listener is close (roughly 40 metres).
'Hide' has no noticeable effect but might possibly quieten a tank very very slightly if enemy infantry are almost on top of it.

hearA.jpg


hearB.jpg
 
Turn 14 from AC

He is moving his shermans up on the right hand side under the cover of the dust clouds from his 105mm (white arrows). After immobilising that tiger he's obviously trying to get a g/dest aswell and force the crew to abandon, even if that's not his aim it could be a consequence. He's had an M-10 immobilised by a mortar strike (black circle), well you can't win them all.

AC54.jpg
 
Turn 14 From numberz.

Not a lot to report, he's moving his brummbar up to meet AC's flanking armored movement (black arrow), and is moving his infantry too (white arrow)

AC55.jpg


Ok here's one thing i've noticed. Numberz has his infantry all squashed up together, but he also has a lot of squads out of commands, most of the groups of squads you see are usually from 2 or more plts. Now i know some people move their inf in tight groups (POS) but IMO this is bad (except for fighting in the woods, but thats an entirely different subject) and having squads out of command is a big big no no, out of command squads are fragile as china and big groups of infantry are just a very nice target for some HE power.
 
Turn 15 from Numberz.

He continues to shore up his left flank, one sherman crests that hill and gets a few shots off at the brummbar, which predictably bounced, but the brum was buttoned up and i don't think it even spotted it, it didn't fire back.

AC has shaken up a few of his squads (on the right) by area firing his M10

AC56.jpg
 
Back
Top Bottom