Welcome to The Few Good Men

Thanks for visiting our club and having a look around, there is a lot to see. Why not consider becoming a member?

PzC-CMFI Ortona Campaign (Axis) thread

O

Odin

Guest
Hello FGM,

I copying and pasting parts of a conversation thread which involves @kohlenklau @Concord @mjkerner @Richtig and myself. The posts are highlights of the German command's Panzer Campaigns - CMFI campaign thread, which is a game organised by PzC campaign legend kohlenklau. The Allied command's DAR can be found on the BF forum here:

http://community.battlefront.com/topic/118835-cmpzc-operation-bloody-christmas-ortona-43/

To give you a quick overview of the concept, kohlenklau uses John Tiller's Panzer Campaigns to create a campaign map (in this case Ortona, Italy, late 1943) to direct the operational level of the game. Individual battles are then fought using CMFI, with Koh acting as GM and editing CM maps and units to represent the campaign level terrain and OOB for the individual battle being fought.

We thought it a good idea make edited parts of the German command thread available to FGM as there have been some great battles played out (and more still ongoing). Please don't take this as a detailed overview of the campaign thus far, there have been CM battles fought which DARs were not created for, so the following posts just represent some of the highlights of the campaign level play and a few of the CM battles.

On my part I produced DAR reports for my previous CM battle fought as part of the campaign. I am currently in the middle of a DAR for a massive 3km x 3km battle which is reaching its closing stages (kudos to @Ithikial BTW for producing a magnificent map).
 
Last edited by a moderator:
@kohlenklau post (6 May 2015):

Hi guys,

You 3 will be my PBEM foot soldiers for the soon to start CMPzC Ortona Operation.

Starting now, please stay out of the Ortona thread over at BFC so we respect Fog of War. :D
I am in the middle of the fence so to speak seeing everything but you guys down at the tactical level will be filled in as needed with intel prior to the PBEM as if I was the axis commander. Fight as hard as you can, I am not asking you to pull any punches. This is a semi-fictionalized scaled down version of what happened so as to make the workload manageable.

OrtonaAxis_zpsvrwlhxv4.jpg


Axis Briefing:
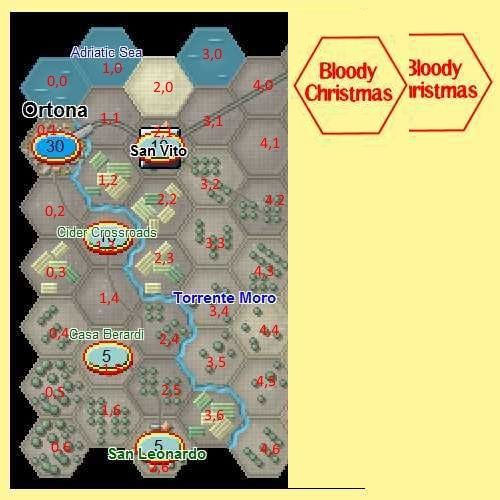
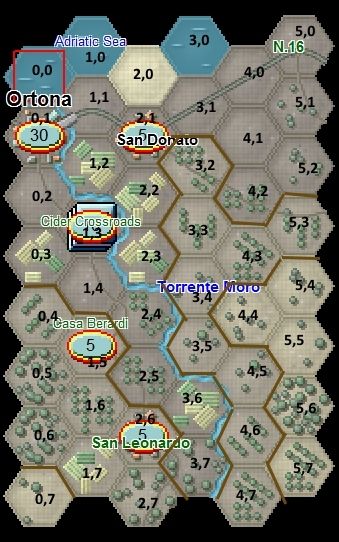
Background: It is 15 December 1943. The weather is cold and cloudy. The axis forces are ordered to delay and hold the British 8th Army back as long as possible. Our starting axis defensive position is along the Moro River and we are preparing the towns behind the river for further defence. Most importantly the main British objective is Ortona because it is on the main highway and because it is a deepwater port. Here is a map of our area. Hexes are 1km x 1km. North is to the left! Note the hexes that are objectives with points.

Allied Forces: We are opposite of elements of a Canadian Infantry Division. We suspect a battalion backed by tanks and artillery.
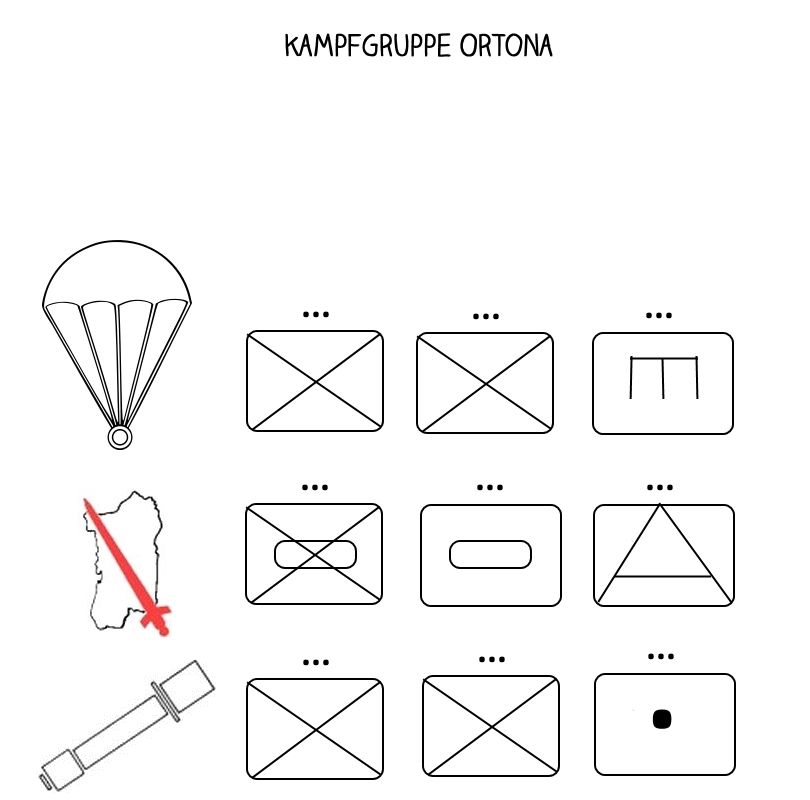
Axis Forces: We have at hand a variety of units. See org chart.


OK, now we have 4 of you guys. I asked Odin to join in as an axis PBEM foot soldier.
 
Last edited by a moderator:
@kohlenklau post (7 May 2015):

OK, assignments as follows and you guys get whatever battles head your way!

mjkerner: 1st Fallschirmjager Division with 2 platoons of fallschirmjagers and 1 platoon of FJ pioneer. Pioneers must stay to prepare Ortona hex 0,1 but the other 2 platoons will be dug in 1 at Cider Crossroads hex 1,3 and 1 at any surrounding hexes.

Odin: 90th Panzergrenadier Division with some mobile platoons (1 of panzergrenadiers and 1 of PanzerIV tanks) will stay back at hex 0,4 initially. The Flak 88's (4 guns) can be dispersed out to San Vito and elsewhere.

Richtig: 65th Infantry Division with 2 grenadier platoons (1 in 2,4 and 1 in 3,6 defending the river crossing) and the artillery static in hex (0,6).

TIGER67: I will update the org chart to add in 1 more grenadier platoon from the 65th Infantry Division located in San Vito with an 88 from 90PGD. You'll probably get the first PBEM!

All your platoons will have at least 1 81mm mortar, 1 pak38 or pak40 and 1 or 2 HMG's.

As the defenders, you will have a certain time limit to stay on map and then can decide if you wish to withdraw or hold the hex and remain in position.
 
@kohlenklau posts (9 & 14 May 2015):

Viz is 3 hexes right now. So the allies will start off with some units spotted.
I am awaiting his actual set-ups and first moves but more or less he will start there along the right map edge.
I added a strip of hexes along the bottom edge and changed San Vito to San Donato.


Here is a map with objectives, hex numbers and contours to show elevation.


FYI, the Moro River is really just a swollen seasonal creek. There is a lot of muddy ground which helps slow/bog/immobilize his vehicles but ours as well....

I decided to assign each axis unit under a specific player.
mjkerner will fight the FJ battles up in Ortona and San Donato.
San Donato is now occupied by an 88 and a FJ platoon.

Odin will fight anything with 90thPG.
Defend along the Moro near Casa Berardi and Cider Crossroads
or counterattack into San Leonardo.

TIGER67 commands the 65th Infantry Division down at the map bottom along the Moro
3 platoons in foxholes and some trenches backed up by Pak40 and Pak38.
Also an 88. And a werfer unit in the backfield of the map.

Richtig will be a reinforcement in a few turns from 26th Panzer Division.
More armor and PG's. As a counterattack force. :D
 
@kohlenklau post (15 May 2015):

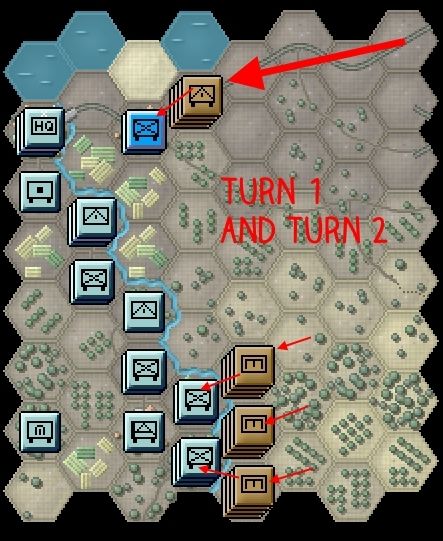
OK guys. Turn 1: he moved his units forward. a mixed group up near San Donato and a main group down at the bottom edge of the map. We fired back and forth and took a few men KIA and inflicted a few KIA but our 88 nailed one of his shermans closing on San Donato!
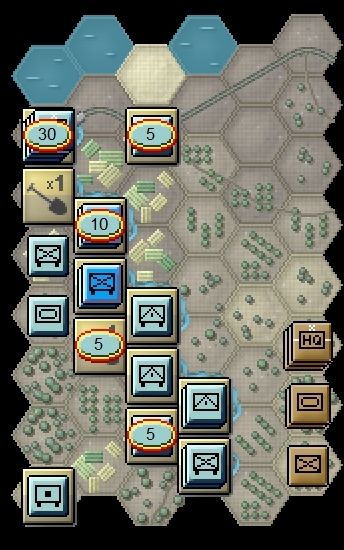
Turn 2: Action Stations! He has declared 3 CM battles. One on San Donato. and 2 crossing the Moro down at the map bottom. See attached map.
 
@kohlenklau posts (15 May 2015):


MJKerner, intel report for San Donato battle:

Canadian troops came down the road very boldly in their carriers. a troop of shermans (3 tanks, 1 of which is now a flaming wreck!) plus scout cars

intel continued: at Turn 1 we saw 5 small units of carriers (number of X vehicles) but one entire troop was disrupted by axis weapons fire and veered off unable to get up their courage to participate in the Turn 2 assault! :DCarriers seemed to tow some guns, or had HMGs, mortars, recon troops. No regular infantry sighted.


Opponent has several troops of shermans attacking into each hex.
Most likely this is a half dozen or so tanks per hex. But approach to Moro is very muddy and he could easily bog. He could/may place his tanks on high ground on his side and attempt to provide general fire support. Recommend you make note from your side of the river areas which has LOS to any highground on the opposite bank and know he can direct fire to those spots.
Enemy Infantry: 2 units per attack numbered xxx men. so maybe 100 per unit, 200 infantry per hex? Some other smaller units attacking. maybe platoons of support weapons. HMG, mortars, guns. All supported by artillery. But he has no TRP's.

You will have foxholes and some trenches, barbed wire and a few sets of mines.
you'll have artillery on call for one hex and werfers for the other. 2 TRP's per hex.
You'll have some 81mm mortars offmap to also call on.

More to follow....
 
@kohlenklau posts (16 May 2015):

OK TIGER67!

Your turn file for set up awaits you. hex 3,7 battle. Good luck.
You have werfers and offmap 81mm.
on map 2 HMG42, a Pak40, a Pak38. 1 platoon infantry.
lots of foxholes, some trenches, some wire, a few mines.
4 TRPs.

Your opponent is Kuderian

[Tiger67's other battle]:

OK TIGER67!
Your turn file for set up awaits you. hex 3,6 battle. Good luck.
You have 105mm artillery and offmap 81mm.
on map 2 HMG42, a Pak40, a Pak38. 1 platoon infantry.
lots of foxholes, some trenches, some wire, a few mines.
4 TRPs.

Your opponent is PhilM
 
@kohlenklau post:

A firm reminder on the fire support rules.
Preplanned missions ONLY for the attacker.
Area fire mission diameter for 81mm mortars is 2 mortars (44m), 4 mortars (88m).
Area fire mission diameter for 105mm is 1 gun (38m), 2 guns (77m), 3 guns (115m), 4 guns (154).
Area fire mission diameter for werfers is 1 werfer (55m), 2 werfers (110m), 3 werfers (165m), 4 wefers (220m).
 
@kohlenklau post (20 May 2015):

news from San Donato:

The Flak 88 was destroyed by allied tank fire. The Fallschirmjagers are repositioning to defend the town and delay the enemy. They still have a 75mm recoilless rifle for AT defense.
 
@mjkerner post (20 May):

From San Donato:

One A/C destroyed, and a new one targeted for the next turn. Fingers crossed! Enemy has about 7 A/C's, 3 or 4 bren carriers, and apparently only one Sherman, and not much infantry. Not sure he can take the village unless he has more infantry somewhere I can't see. I haven't had any more losses since the 88 and crew.
 
@kohlenklau posts (3 June 2015):

I am wrapping up the top of turn 2.

The allied probe towards San Donato did not take the hex but our axis troops have lost all their heavy weapons. We will reinforce them if possible on the bottom half of turn 2.

The allied assault on Hex (3,6) has been successful. Their infantry is across the river and clearing a few remaining defenders out of their holes. I anticipate they will pause to get armor across.

The allied assault on Hex (3,7) is in progress but I have ordered TIGER67 to withdraw his forces to San Leonardo. Use smoke to mask his departure and shell the enemy until all offmap ammo is depleted.


@mjkerner will prepare the San Donato map to show craters from previous battle.
I will prepare a "briefing" for mjkerner and we will see what we do in that area to slow the allied approach toward Ortona city hex and cover the flank of the other units in KG Ortona.

@Richtig is in standby for 26th Panzer counterattack.
 
@kohlenklau post (5 June):

Odin!

Please assume command at the hex 3,7 battle. TIGER67 is KIA and unable to continue the battle.
Orders: The battle in hex (3,6) is completed.
EDIT: Our forces are shattered and the position is crumbling with only a dozen of our men escaping.
That is your left flank for your battle in hex (3,7) I have ordered a withdrawal to San Leonardo. Go ahead and evacuate your troops to the green exit zone strip to your north immediately. Use any smoke grenades the teams have and any other available mortar smoke to first mask your departure. Examine the wind and land the mortar smoke so it floats along the map and helps block LOS for as long as possible.
EDIT2: At your discretion retain AT guns and fire on the enemy then dismount just the crew and spike the guns. That versus trying and failing to evacuate the guns. Your call!
Keep an FO on map and attempt to lay down your indirect fire on the enemy until out of ammo. Then pull out your FO as well. Do you understand? Do you understand? Over.. :D

goodluck Odin
 
@Odin posts (5,14, and 23 June 2015):

I'm not going to be able to save the AT guns, and one is being moved by foot, so I am going to redeploy this gun and hopefully it can inflict some damage before being destroyed. I'm pleased to say the other gun is going down fighting.


Given the exposed fields to the infantry's rear I think it's likely that they are going to suffer significant casualties pulling out. My plan is cancel the mortar barrage so my observer team can call in a nebelwerfer strike on the crossing points. One of my platoon HQs will also call in some mortar smoke where upon the infantry will flee for their lives!

Two Sherman have been spotted so far, I presume there is one other as part of the troop.

14 June post:

Quick update re my current battle.

First troops are exiting the battlefield, with relatively light casualties so far. There are still 8 minutes until the nebelwerfers drop though.

CM%20Fortress%20Italy%202015-06-05%2011-58-36-04.jpg


here's an update screenshot of the the battlefield. I'm starting exit units

CM%20Fortress%20Italy%202015-06-14%2008-50-49-64.jpg


23 June post:

My battle with Kuderian has just finished after I pulled my men out and hit the surrender button. I've suffered just under 30 casualties and Canadians have suffered 10 KIA/WIA. Unfortunately I didn't really manage to dent the Canadians who look like they're advancing in significant numbers.

Looking forward t getting my hands on some armour and doing some damage!
 
Last edited by a moderator:
@kohlenklau post (5 June):

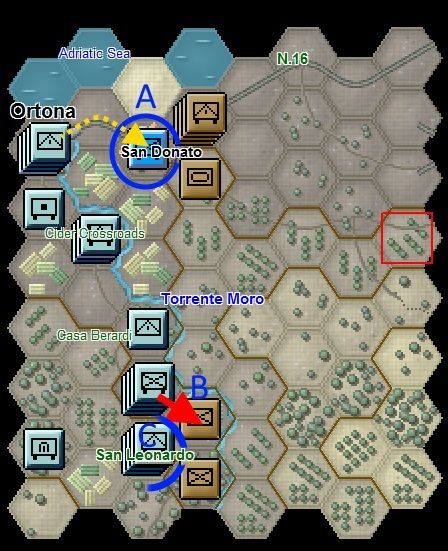
We are technically still winding down the allies part ("the top of the inning") of turn 2 and when we get our axis bottom of the inning, then I propose the below and await your inputs/remarks/ideas...
A. attempt to reinforce San Donato with some heavy weapons to hold off the allies.
B. Counter-attack by Odin with 90PGD armor and infantry and remaining platoon of 65ID.
C. Defensive posture in San Leonardo. Rest troops and be ready for Allied assault in turn 3.
 
Odin's response to Koh's campaign question:

Your plan seems sound to me. One point though, which hexes to the south contain bridges to cross the river? The enemy looks like it is weak in 'B' so I think it is worth counter attacking as you suggest. But looking how weak the bottom square to the right of San Leonardo is, is it also worth attacking there with units from C in order to eliminate the enemy bridgehead?
 
Last edited by a moderator:
Koh's reply to Odin:

Our forces in C are inadequate for attack. Maybe for defense a.s .well!

I think we just let the soldaten in C rest up. Only stragglers and rear area troops!

We also will alert Richtig and his 26 Panzer Div. troops to road march towards C.

We do not know yet the number of sites the allies are able to cross at...

We think they will first use 3,6 since it was the first to be taken in an assault...

maybe only there or only 1 other site at maximum.
 
Last edited by a moderator:
@mjkerner sitrep for for battle in Hex 3,6 (7 Jue 2015):

The Allies' forces have secured a bridgehead over the Moro. Approximately 2 infantry companies, 2 Sherman platoons (I counted 8 Shermies at one point), and some H/T's and bren carriers. Not sure if the latter are recon or support elements, or simply that the infantry is mechanized.

I have no idea how badly I hurt them. I had partial and full penetrations on at least 3 Shermans, but each survived (popped smoke and backed out of the fight) before I lost my 75mm ATG. Arty and some infantry fire caused some Brit infantry casualties, but no idea how many. Let's put it this way, the Brits are in good shape here.
 
@kohlenklau post (12 June):

Turn2A: The latest status. Odin is trying to pull back from hex 3,7 towards San Leonardo. A tough situation. Anything he can save will help defend S.L.

Thinking of a 3kmx3km battle
 
Koh posts (14 June):

Odin's Assault Preliminary Briefing <more details later>
The next phase is turn 2b and axis gets to move and assault. :D
Your force now consists of 6 Pz4 tanks, 2 platoons of mounted panzer grenadiers and 1 platoon of 65th Infantry division, an FO supported by the 105's and werfers. You would phase arrive on the map at start, T=5,T=10,T=15 and goal would be to inflict major damage upon the allied bridgehead over the Moro in hex 3,6. Initial resistance is expected to be only infantry forces with AT guns supported by artillery. The only vehicles may be some carriers and jeeps. You will be under long range fire from any allied tanks on the far shore from the distant fields. They'll be busy down by the river trying to get their armor across any part of the Moro that they can prepare as a crossing. Expect additional infantry forces to reinforce them as the battle progresses, around T~40-45. So, most likely you will need to pull back and avoid any significant losses to your force. Get back to the north side of "Phase Line Gertrude" by T=60.

<Once I pass you the force structure and the rough map with set up/entrance zone you can specify the route march order, i.e., who arrives on map at start, at 5,at 10, at 15....>

[Next post]

Hi Richtig,

As turn 2b is occurring above with Odin, we are preparing defenses in S.L.
I think that the allies will most likely assault into San Leonardo in turn 3A.
If they do take it, then you will command a 26th Panzer Division counterattack into SL in turn 3B.
 
Odin post (14 June) regarding his next battle at San Leonardo:

kohlenkau thanks for briefing looking forward to the battle. Just to confirm the aim of my battle is to probe the enemy lines and inflict casualties rather than take ground? Also will the enemy tanks just play a role firing on my men on route to battle at PzC level, or are they likely to be encountered in the CM scenario?

Koh's reponse:

Owen, yes, counterattack/probe forward but don't stay there, hit and run so to speak.
Note: The platoon of the 65th goes to S.L. after completing the counterattack/probe.
You may see Shermans off in the far distance in the CM battle. Maybe use smoke or whatever you think is best to block their LOS. Or try and snipe them with your tanks!

Concord gets the defense of San Leonardo in 3A. Sean, these are just the remains of the 65th Infantry platoons we started off with. You do have some AT guns. An 88 and a Pak40. And a few scrounged up rear echelon forces I will supply you. Not sure yet what indirect I can give you. I will die roll at that time to determine ammo supply!

Richtig gets the counterattack in 3B (not mulitplayer, just Richtig as per Odin's post).
Unless Sean holds them out of S.L.! :D
 
Back
Top