B
Blady
Guest
So, Tchoup and I have been battling out a few matches now, and they have been getting bigger and bigger. So we got ballsy and decided to for a huge scenario, and our choice fell on the Fire and Rubble scenario "Seelow Heights", representing part of the battle of the Seelow Heights (https://en.wikipedia.org/wiki/Battle_of_the_Seelow_Heights). For those that like a (modern) google maps view, this is roughly the battlefield we are talking about: https://www.google.com/maps/@52.5398963,14.4199295,2999m/data=!3m1!1e3.
I do not think I am a particularly good player, so I decided to start a DAR not just to share the more then fair amount of tank pr0n that this battle will contain, but also to obtain real-time tips, tricks and advice from you guys while going through it. So feel free to criticize or otherwise comment on all of my actions. I do admit to being quite stubborn, so sometimes I might ignore your advice and will learn the lesson the hard way. I'm not such a detailed and attentive player like @Drifter Man, so expect slightly less detail here and more generic updates. But feel free to ask for more details!
So, here we go with my pre-battle analysis, and since the first turn is already played I'll post about that after this. I've opened up the scenario in the editor for part of my pre-battle analysis, but have not looked at anything but the map itself. So in terms of objectives and (enemy) units I rely solely on what I am given by the scenario designer.
Map and Objective

So the map is mostly flat and 2000x5000m big. The map starts on my side with very little concealment and cover and it's very flat with some very small height differences of at maximum 2 meters. That is hardly enough to hide a man, let alone a tank or a whole company of men. To make matter worse the land is criss-crossed by several moats or ditches. Crossing the map from north to south is the Hauptgraben, which only has 4 crossing points, 2 foot bridges where I will only be able to cross over with infantry, one stone bridge in the middle of the map where Reichstrasse 1 crosses the Hauptgraben and one "land bridge" where the Hauptgraben is interrupted to let a road cross over land. Then there is a collection of other ditches that usually do not connect to each other, but allows a small land crossing of 1-2 action spots to connect the different fields.
It's this flat until the forested slopes of the Seelower Heights. Just before the town those slopes start going upward and there is a good tree cover before opening up again on the heights itself. The town is about 50m above the lowlands where I start.
I am attacking from the east (right side) and have several objectives:
1. The crossing of Reichstrasse 1 and the Hauptgraben (the stone bridge)
2. The approach to Seelowe (roughly where it says "Reichstrasse 1" on the map)
3. The train station
4. The town of Seelowe
Conditions
The time is 8.00am, it's cold and there is a thick haze with maximum visibility of about 1000m. The ground is muddy. Muddy ground and a tank heavy force means that most likely even the small land crossings around the ditches are a risk, given that they are surrounded by muddy ground. This means that my tank-heavy force is seriously hampered by the ground conditions and will likely need to stick to roads for maneuvering...

Main terrain features

There are several terrain features I would like to highlight that I think are crucial:

Enemy Forces
Not much is known. Briefing mentions that aerial reconnaissance indicates a line behind the hauptgraben and along the seelow heights. Looking at the map these seem the most logical points of defense. Given I have a very tank heavy force I can expect a fair share of Panthers, Tigers and King Tigers. Historically speaking I know there were quite a few King Tigers involved so I know I can expect them. There has also been a gruesome fighting around the train station historically, which, again, seems like a logical place for our infantry fight to take place too.
Friendly forces
Briefing mention I have the complete 104th Guards Heavy Tank regiment here, with elements of the 172nd Guards Rifle regiment. At setup I have about half of both, so i expect reinforcements to bring the rest of the 104th heavy tank regiment.
Reinforcements:
8.05: The rest of the 104th Guards Heavy Tank regiment
8.10: Elements of the 11th Guards Medium Tank brigade
8.15: Wave 1 of the 394th Assault Gun regiment
8.20: Wave 2 of the 394th Assault Gun regiment
Artillery:
Plan of attack
Given the layout of the map and the weather conditions there is not much room for maneuver and I'll be more or less forced to have the Reichstrasse 1 as a main axis of attack. I will try to reach the first line through 3 axes, and from there I will detail my approach to Seelow a bit better. But in general I expect to push in the south first, then move towards pushing from the north:

Avenue 1: The main armored and infantry push towards the bridge. It's far from ideal, but with only muddy, open, ground as alternatives I think any other approach is even more suicidal
Avenue 2: An infantry push along the ditch towards KT44, crossing the foot bridge
Avenue 3: A smaller push with at most 1 company of T-34s in an attempt to outflank the southern defending tanks. They may get stuck in the mud crossing from the south to the north after crossing the Hauptgraben, so I will review once they are across wether they will push north or go back the long way by road depending on the situation then
Avenue 4: Let's cross the Hauptgraben first....
I preplanned the 132mm rockets on the expected tank positions and one of the 122mm batteries on harassing fire on the suspected infantry at KT7 in 15mins time. Hopefully that will give enough cover to set up the bases of fire...
Pressing red button now... wish me luck!

I do not think I am a particularly good player, so I decided to start a DAR not just to share the more then fair amount of tank pr0n that this battle will contain, but also to obtain real-time tips, tricks and advice from you guys while going through it. So feel free to criticize or otherwise comment on all of my actions. I do admit to being quite stubborn, so sometimes I might ignore your advice and will learn the lesson the hard way.
I'm not such a detailed and attentive player like @Drifter Man, so expect slightly less detail here and more generic updates. But feel free to ask for more details! So, here we go with my pre-battle analysis, and since the first turn is already played I'll post about that after this. I've opened up the scenario in the editor for part of my pre-battle analysis, but have not looked at anything but the map itself. So in terms of objectives and (enemy) units I rely solely on what I am given by the scenario designer.
Map and Objective
So the map is mostly flat and 2000x5000m big. The map starts on my side with very little concealment and cover and it's very flat with some very small height differences of at maximum 2 meters. That is hardly enough to hide a man, let alone a tank or a whole company of men. To make matter worse the land is criss-crossed by several moats or ditches. Crossing the map from north to south is the Hauptgraben, which only has 4 crossing points, 2 foot bridges where I will only be able to cross over with infantry, one stone bridge in the middle of the map where Reichstrasse 1 crosses the Hauptgraben and one "land bridge" where the Hauptgraben is interrupted to let a road cross over land. Then there is a collection of other ditches that usually do not connect to each other, but allows a small land crossing of 1-2 action spots to connect the different fields.
It's this flat until the forested slopes of the Seelower Heights. Just before the town those slopes start going upward and there is a good tree cover before opening up again on the heights itself. The town is about 50m above the lowlands where I start.
I am attacking from the east (right side) and have several objectives:
1. The crossing of Reichstrasse 1 and the Hauptgraben (the stone bridge)
2. The approach to Seelowe (roughly where it says "Reichstrasse 1" on the map)
3. The train station
4. The town of Seelowe
Conditions
The time is 8.00am, it's cold and there is a thick haze with maximum visibility of about 1000m. The ground is muddy. Muddy ground and a tank heavy force means that most likely even the small land crossings around the ditches are a risk, given that they are surrounded by muddy ground. This means that my tank-heavy force is seriously hampered by the ground conditions and will likely need to stick to roads for maneuvering...
Main terrain features
There are several terrain features I would like to highlight that I think are crucial:
- T1 is a slightly elevated (+1 meter) farmhouse with some trees and a stone wall that could be used for a firebase towards the bridge
- T2 is on the main approach to the bridge, has some trees and a small dip in the land, I'll be able to get a few tanks in a partial hull down position towards the expected enemy tank positions, and will likely serve as my armoured fire base in the push towards the bridge
- T3 is also slightly elevated (+2 meters) and can also serve as a fire base for assault guns/tanks in the push across the Hauptgraben
- T4 is a bushy area just before the foot bridge to T7 which will likely be the staging area for the infantry attack on T7
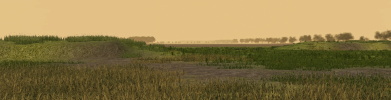
- T5 are the northern suspected enemy tank positions. There are 3 artificial hills there, perfect for hiding a tank behind in a hull-down position (see picture below)
- T6 are the southern suspected enemy tank positions, 2 artificial hills here
- T7 is a small foresty patch behind the stone bridge, most likely the enemy infantry base for defending the bridge
- T8 are the foresty slopes including the railway and railway station covering the approach to the town
- T9 are the first buildings of the town. The top floor has a view on the approach to Seelow
- T10 is the only part I could find of the Seelow Heights which has a view on the approach to Seelow, a good enemy tank/gun position.
Enemy Forces
Not much is known. Briefing mentions that aerial reconnaissance indicates a line behind the hauptgraben and along the seelow heights. Looking at the map these seem the most logical points of defense. Given I have a very tank heavy force I can expect a fair share of Panthers, Tigers and King Tigers. Historically speaking I know there were quite a few King Tigers involved so I know I can expect them. There has also been a gruesome fighting around the train station historically, which, again, seems like a logical place for our infantry fight to take place too.
Friendly forces
Briefing mention I have the complete 104th Guards Heavy Tank regiment here, with elements of the 172nd Guards Rifle regiment. At setup I have about half of both, so i expect reinforcements to bring the rest of the 104th heavy tank regiment.
Reinforcements:
8.05: The rest of the 104th Guards Heavy Tank regiment
8.10: Elements of the 11th Guards Medium Tank brigade
8.15: Wave 1 of the 394th Assault Gun regiment
8.20: Wave 2 of the 394th Assault Gun regiment
Artillery:
- 2x 122mm Howitzer
- 1x 152mm Howitzer
- 2x 83mm Rockets
- 2x 132mm Rockets
Plan of attack
Given the layout of the map and the weather conditions there is not much room for maneuver and I'll be more or less forced to have the Reichstrasse 1 as a main axis of attack. I will try to reach the first line through 3 axes, and from there I will detail my approach to Seelow a bit better. But in general I expect to push in the south first, then move towards pushing from the north:
Avenue 1: The main armored and infantry push towards the bridge. It's far from ideal, but with only muddy, open, ground as alternatives I think any other approach is even more suicidal
Avenue 2: An infantry push along the ditch towards KT44, crossing the foot bridge
Avenue 3: A smaller push with at most 1 company of T-34s in an attempt to outflank the southern defending tanks. They may get stuck in the mud crossing from the south to the north after crossing the Hauptgraben, so I will review once they are across wether they will push north or go back the long way by road depending on the situation then
Avenue 4: Let's cross the Hauptgraben first....
I preplanned the 132mm rockets on the expected tank positions and one of the 122mm batteries on harassing fire on the suspected infantry at KT7 in 15mins time. Hopefully that will give enough cover to set up the bases of fire...
Pressing red button now... wish me luck!
Attachments
Last edited by a moderator:


