Welcome to The Few Good Men

Thanks for visiting our club and having a look around, there is a lot to see. Why not consider becoming a member?

Turn 2: Day 1 Morning

S

Strachwitz

Guest
@PhilM @Nathangun

Dear Comrades in Arms,

As everything is now ready for Turn 2 we can begin discussing our next moves. I am not at home now so this will just be a short information what is up next. Ithikial provided the updated map in our Dropbox folder. You may want to have a look at it there or wait until tomorrow when I am able to put up some screenshots to have everything at hand we need in this single thread.

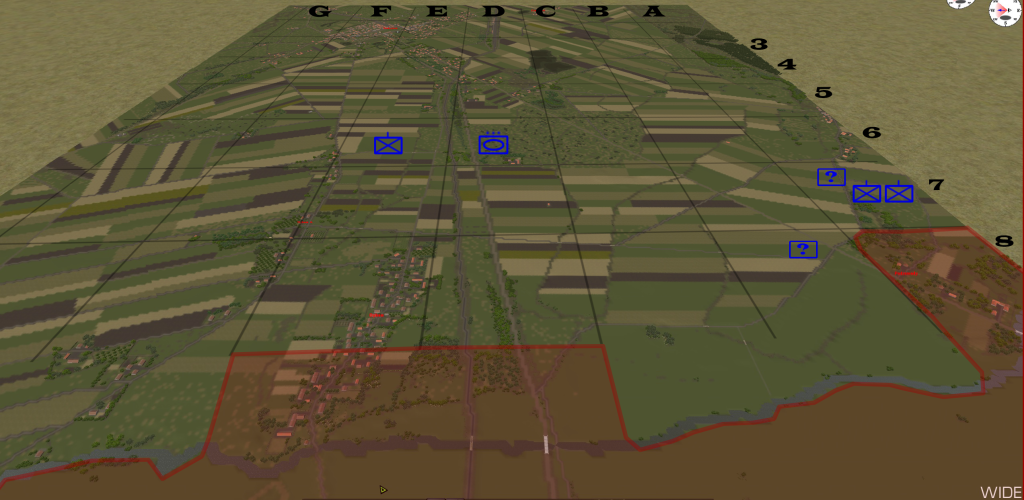
First of all we did a very good job on the first turn. Although we had to cross a river and stretches of open land we successfully established 3 beachheads on the other side of the river. Good job! Our great leader Stalin sure is proud of the brave men of 3rd Tank Corps!

Our losses seem brutal at first glance, especially in the tank department but the good news is the enemy also suffered. They lost nearly as much tanks/TDs as we did so our first move was outstanding successfully! Now we need to maintain the momentum and drive on!

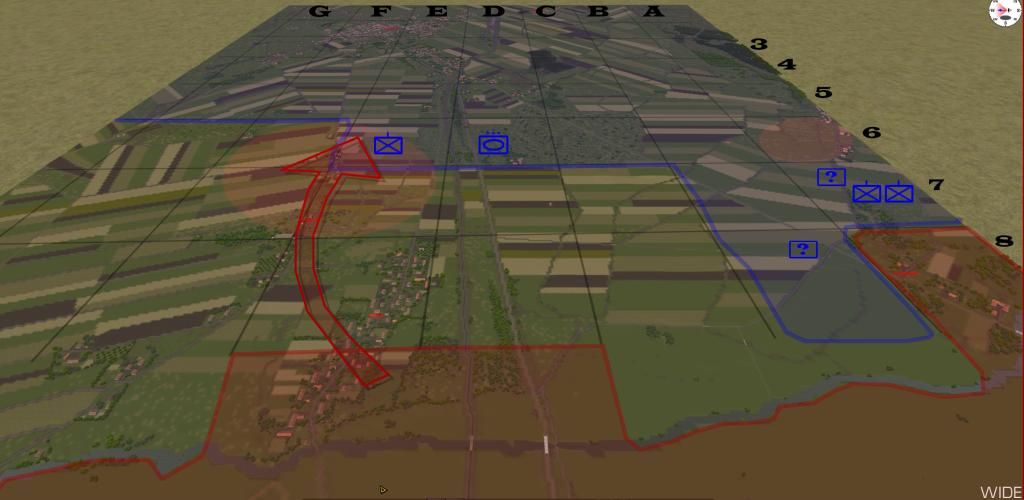
My first thoughts about the current situation is that we should concentrate mostly on one, maybe two axis of advance and put a maximum of pressure on the enemy. Right now I think we should advance on the northern two bridgeheads and just prepare defensive positions in the south. I will post some screenshots tomorrow of the actual battlefield as it is a bit difficult to read the terrain on the overview map. Then we can decide about our new moves...

Let me hear what you guys think!
 
As noted in another post (and thanks for your reply @Strachwitz :)), I need to regain access to our drop box folder ...

Once I've done that and had a look at the updated map, etc, I'll come back with some thoughts ...
 
Turn2_neu_zpsw9lu6p3g.png~original

Overview of the northern part of the map. In this view I think we can better see and judge the terrain as in the strategic map. It was done in a bit of a hurry so please excuse the crappy look!
 
@Ithikial: I have a question regarding hex field E8 (village of Dyson). I know we can`t see through this hex as it is blue but can we see into the hex from adjacent hexes? So basically would we now spot enemy units there from E9 or D9 or not?
 
You can see clearly for 4 squares this campaign turn as it's full day light now. For blue squares, yes you can see into them (and in this case adjacent) just not through. Your own forces in D9 have unobstructed views looking west from their position. There's nothing in the center squares for columns 7 and 8 between you and and the remaining German forces so it will be a long slog across a CM battle map to engage the enemy again if you attack from this position.

The forces that you are spotting are the same forces you fought last time so are identifed. Keep in mind the enemy have the same campaign map level intel from prior engagements.

Hope that helps.
 
Yes it definitely helps :). But spotting remains a bit of a mystery so one question for the allknowing GM. What hexes of columns F and G we are able to see? Or to be more exact can we spot enemy units in F6-8 and G6-8?

We will now beginn planning for the next turn!
 
You can see 4 hexes this turn. All I'm going to say. :)

I may be misunderstanding this, but ... what?

I'm not hoping - at all - to be given hints, or bypass FoW: but surely we can - must - know which squares we can see into, and which we cannot?? If we were there on the ground (the fiction we are trying to sustain) we'd know if we could or couldn't see (ie not necessarily spot) into a speciifc map square? It's not gaining an advantage to know how the mechanics work?

Does the four square limit work diagonally?

So, can we see from E9 into F6 and G6? Or not?
 
Turn2_options_zpscevi6sn2.jpg~original


Situation map updated in the north.
My initial thoughts on the next turn are the following:

Securing Hexes FE6 and FE7 (along with the rest of Dybow) should have priority I think. At least there are a few houses which provide cover and concealment and so this area could be a staging area to driver further west to Radzymin the next turn.
Also securing Hex A6 could be very usefull. First securing our flank and second this area could also be a staging area for the next turn.
As there are many open areas we should be hopping from "cover to cover".

In the south I tend to withdraw our units back to GE12. Starting in I11 is a bad idea. Our units would be sitting ducks in the open. So I think it is best to "just" secure this area and not advancing further. Setting up positions an GE12 (starting positions on tunr 1) gives us the best positions to secure the flank.

The main problem is, I don`t think we have enough resources to have two attacks. We should attack in full force in one location. Maybe we could use artillery and rockets to soften targets in the other areas like A6.

@PhilM @Nathangun : What`s your take on the situation?
 
I agree with the idea of one main thrust ... and if there is only one main attack, that must be in the centre, as the left and right flanks are too "extreme" to form the main axis of the advance. So, going for F/E 6&7 is fine by me.

But ...

We don't want to let them think we have given up on the flank positions, as it will enable them to draw more reserves back to the centre to counter our main attack ... so is there a way we can do some "sabre rattling" on the two flanks, to keep them on their toes there?

In the south, I definitely would not go back as far as G/E 12 ... that would give the unopposed river crossing back to them, at no cost. I would put defensive forces in H11 & 12 and I11 & 12 ... but back on the east side of the river in all cases (including the little bit of I11 east of the river), and make them pay to cross back over the river at that point, if they want to try.

It also - provided that we can defend it! - keeps that river crossing in our hands, and offers a potential advance route to us, and so offering a threat that they must continue to guard against and so keep some forces back from countering our main central thrust.
 
I totally agree with your proposal @PhilM attacking in the centre and having some sabre rattling on the flanks. We have to keep them guessing what exactly is going on.
I guess you now had time to have a look at the updted map @Nathangun, and there you will see that the enemy is not really weak at the northern flank. Directly in front of our units in A7 there are 2 Infantry Companies and 1 unidentified Unit and also in A8 there is 1 unidentified unit. I think it is difficult to attack in the north and the centre simultaneously this turn. We suffered high casualties and I think we have to strike with a maximum force on one location. Centre or in the North. For both we simply have not the manpower.
If we attack in the centre (which I favour) we definitely need some sabre rattling in the north. I think of heavy artillery strikes and maybe some scouting to see what exactly we have in front of us.

As for the south part of the map @PhilM . I have gone through the same considerations and also didn`t want to give up the river crossing. But our hands are a bit tied manpowerwise. I also would like to place our forces in H11 & 12 and I11 & 12 but these hexes are very flat and open with less to zero cover & concealement. They would be sitting ducks and nearly instantly spotted in the open whereas the enemy could fire and observe from concealed positions in for example J11/J12. So maybe pulling back to G12/F12 gives us better positions to fend of any attack?
 
Just to let you both know. As it looks like we will only get 2 new battles (unless the enemy is going to attack down south which I doubt) this turn I would like to have @Nathangun in the north (supposedly sabre rattling) and @PhilM commanding the central attack! I hope you are fine with that @Nathangun that you probably again have no full scale attack this time! But your time will come for sure! The north is next with advancing!
 
Some thoughts from me ...

I'm happy (sort of! Big responsibility!) to take the centre battle this time: I'll try to keep our momentum going, and not fail!

A general question about moving units around: given the movement allowances the units have, how practical is it now to move units from the north and south flanks to reinforce the centre attack this time? Or are we stuck, in practice, with the units we have now in the three areas, because they cannot get to the centre in time to make this next battle?

And on the southern flank ... I'm still sort of hung up on the river crossing! I take the point about the open country and the best place to defend in, but ... in detail, are those open stretches of land overlooked / spotted from the other side of the river? Or, do they have to re-cross the river to be able to fire on those areas?

And ... I may be mis-remembering my map from last time, but I recall that the wooded hill in the extreme SW corner of I11 - ie the extent of my advance / gained ground last time - was a useful defensive location, at least for a "trip wire" location, to highlight any advance by them on the ford. Also the ford itself had some foxholes, etc - still there?

If (???) they are very weak now, and need to fall back to the centre ... do they have any forces to make a real assault this time on the river crossing? Perhaps we could leave enough there just to try and halt any probe by them? If we have to cede the ford to an assault, OK; but I'd hate to leave it empty, and let them come back across the ford and take it back again with just a recon KW team, which is all it would take if we empty I11 completely ...
 
We can move units around as we wish with one limitation: Units adjacent to enemy units are not allowed to move. So we try to reinforce in the centre as best as possible. But we have a little (or big) problem with our units in the south I have to sort out. Regarding your question about if they have to recross the river to fire into F12/G12. The battlefield can have a maximum of 5x5 squares (if the defender chosses to expand by 1) so it is possible to them have a battlefield including good positions on their side of the river and including our suqares. But I highly doubt they will attack but we take precautions against that and are preparing a good defense there.
The wooded area in I11 is there, that is true. But you have to consider if we wold attack from there it it the only possible, very small area we could have troops in hiding. Sure they would know that and bomb us the hell out of there with heavy artillery. We could not hang on there for long and I doubt we could spring an offensive there. That surely is a pitty and also hate it we have to leave that spot but I don`t see much of options there. I think it is mandatory to focus on the north and maximising the efforts there. Trying to achieve something on all three areas would leave us relatively weak in all areas.

@Ithikial: First I haven`t thought it is important but now that I reread the manual we have to edit the campaign map to some degree. All units in I12 are located in a the wrong hex. We just sent some few units over the river but we never intended to move all units to that square leaving our units in the open and making them sitting ducks there. Although we won the battle and the quare is now "ours" I didn`t intend them to move all there. Because now we are stuck, can`t move the units and sitting right in the open. So we have to edit this and move them back to their original destination!
 
I realise we can move units around (subject to the enemy ZoC limitation); but what I meant was, given their movement allowances and the distances involved, can we *actually* make moves in practice that gets units where they need to be in the centre?

I still think we are at cross purposes (or, I am confused anyway!) about the southern front part ...

Firstly, their (possible) attack, our position / defense there: do we really think that they both have the forces, and will use them this time, to make any sort of heavy attack here? Given their losses in the centre and north, will they not have to draw back and consolidate towards the centre? If that is so, we don't need to guard against a heavy attack, just leave enough to stop a recon team of theirs wandering over the ford and reclaiming it "for free" ...?? Do they have enough arty to spare to use a chunk of it hitting I11, if we leave a small screening force there??

Secondly, on the battlefield size / location, and firing into our positions: my last map didn't cover these parts, so I don't know the answer, but what I mean is, is there actually LOS from, say, I10 to H11, so that any of our units on our side of the river can actually be fired on from their side of the river? Or do they actually have to come through I11, past and over the hill and across the ford, before they can spot / fire on any of our forces? (To get over the river, other squares are blocked, they - and we - HAVE to use I11: I cannot see how we just leave that empty and give it up for nothing?)

Thirdly, I11 as a possible start point for our attack: yes it has limitations, but ... this time we aren't (really) "attacking" there, just keeping them busy, so it doesn't need to be the base for a real attack by us, but needs just enough presence from us to make them worry, AND show that we haven't just given it up.

I suppose overall I think giving the ford up is at best a gamble: if we win quickly, before they get their reinforcements, it may not come back to haunt us later. But if we are still in action on later days, I can see a strong counterattack hitting our left flank, and we'll wish we still opposed them at the ford ...
 
Back
Top